Sunday, June 28, 2009

Swine Flu Microscopy

Though I may be a little late blogging about this, H1N1 (swine flu) has some potential to stage a major comeback during the upcoming flu season. So, perhaps I'm early.
The image to the left of the H1N1 virus that was shown all over the news was taken on a Transmission Electron Microscope at the CDC Influenza Laboratory. The virus is about 80-120 nanometers in diameter. H1N1 was able to transmit from pigs to humans though what is called, "antigenic shifts." In fact, the H1H1 strain is a combination of bird influenza, swine influenza, and human influenza.
See this image and more like it in much higher resolution on the Centers for Disease Control and Prevention website.

Friday, June 26, 2009

The Nano Song

Here is the winner of the ACS-Nanonation's nano-video contest. If Jim Henson was around today, I think he'd approve.

...Nano!!!

Wednesday, June 24, 2009

Muscle fibers

dailymotion.com has some amazing videos made by a group called Weird_Weird_Science about zooming into objects. They zoom into hair, Aluminum, a tooth, concrete, and many others including this video of lice. In this video, the highlighted feature is muscle tissue.

Here (right)is image that I took on one of our microscopes (the Philips CM-12 TEM) of some muscle tissue from a mouse. This tissue looks better preserved than the lice muscle and may give you a better idea of how the muscle bundles are organized. Click to enlarge.

Sunday, June 21, 2009

Pollen Animation

If you've ever wondered about pollen, here's a good one for you. I found this interesting feature while examining a small grass flower in a Scanning Electron Microscope. Click on this link to see the animation. The pollen is sitting on the inside of the petal and as the image rotates, the object that comes in from the top-left and eventually covers up the pollen is the top side of the petal. I apologize if this takes a while to load on your computer. It is a rather large image file. I found that Firefox displays it smoother than Safari.
To produce the animation entailed taking 61 different images with the microscope. After taking each image, I tilted the sample 1 degree in the Z directions and reoriented in the X and Y directions in order to bring the area of interest back to the center. Then, additional focusing a stigmation correction was required in order to keep the image looking sharp. Once all off the data had been collected, the images were adjusted for brightness and contrast with Photoshop and the .gif was made with Image Ready.
These images were taken on a Hitachi 2700 SEM in the Madison Area Technical College Electron Microscopy Lab. The image on the right was colorized in Photoshop.

Thursday, June 18, 2009

More Amazing Antique Microscopes

Here is another site with some amazing images of antique microscopes. Allan Wissner of antique-microscopes.com has a massive collection of beautiful and impressive microscopes ranging from a 1770 Solar Microscope to a 1930 Carl Zeiss Spectroscope. If you're trying to find something specific, the site index has the collection organized by country of origin and maker. I could spend hours looking at these images. Speaking of which, a page of this site is dedicated to links of other microscope collections. Thank you Allan for your wonderful contribution to the microscopy world!

Tuesday, June 16, 2009

Colorized Bacteria

This is an SEM image of bacteria infested mouse intestine. It took me several evenings to colorize it with Photoshop. Those tiny bacteria took forever to loop. The sample was provided by Ivalyo Ivanov of the Littman lab in the NYUMC Skirball Insitute. Click to enlarge.
I worked on this sample on a Zeiss Environmental SEM called the EVO but couldn't get very good results. So, we decided to work directly with Zeiss to get improve them. My boss traveled to Harvard and worked with Doug Wei from Zeiss on another Zeiss microscope called the VP Supra SEM. The difference between the EVO and the Supra is that the EVO can image wet samples but has a tungsten filament. The combination produces lower resolution images. The Supra can do variable pressure EM so there is a little more sample prep involved, but you don't have to coat the sample with metal, and this microscope also uses a Field Emission Gun that produces images with much better resolution. We've applied for a grant to purchase this instrument. If it's approved we can get one for our lab and do similar work.
To the right is the original image. It was taken on the Zeiss VP Supra by Doug Wei and colorized by me in Photoshop.

The Man in the White Suit

Here's a still from a neat 1951 film called, "The Man in the White Suit." Check out the clip. "..it's an electo..electron er..electron microscope."In the business, we call those EM-TJ's (Electron Microscopy Technician Jumpsuits). I wear mine everyday!

Molecular-Gear

Along the same lines as the molecular-car (something I would have blogged about had I started this four years ago) is the molecular-gear. This gear has a diameter of just 1.2 nanometers! The major breakthrough here is that this gear can be deliberately rotated. Previous developments in molecular gears resulted in random, uncontrolled rotation and displacement. Possible uses of this gear could include the building of molecular scale machinery for use in biological or material advances.
This was developed by a group (lead by Christian Joachim) from A*STAR’s Institute of Materials Research and Engineering (IMRE) in Singapore. You can download the full .pdf abstract here.

Sunday, June 14, 2009

Condenser Lens

Here is an interesting piece. This is a condenser lens. It is one of the most important parts of an electron microscope because controls the intensity of the electron beam.My boss gave this to me on one of my first days in the lab and it's one heck of a paperweight. The thing weighs a ton because it is essentially a giant coil of wire. The coil is a big controllable electromagnet and "condenses" the size of the electron beam as it passes through.

Friday, June 12, 2009

Armadillidiidae gonna eat you

Along the same lines as the guppy teeth, here are a couple of neat images I took of an Armadillidiidae (sometimes called a potato bug or pillbug).
I remember my friend trying to fry one of these guys with a magnifying lens when we were kids. The poor thing rolled up in it's little ball and a minute later we heard it sizzling. But I guess that's no worse than what this guy went though in order for me to be able to put him into the microscope. Sample processing for SEM of biological material consists of fixation with aldehydes and Osmium tetroxide, dehydration with a graded series of alcohol, something called critical point drying, and finally sputter coated with gold. Obviously the insect wasn't alive during all of this. I put him in the refrigerator beforehand. The cold puts them into a sleeping/hibernation mode. Likely he felt no pain.
These images were captured on a Hitachi 2700 SEM.

Changes yet again

I realized that the EM Protocols site was getting a bit jumbled and unorganized. As I continued to add protocols, it became a long string of unrelated articles and anyone wanting to find one might have a difficult time. So, I have changed the blog, "EM Protocols" to, "EM Protocol Dump". This site will not change, but continue to be a confusing long string of unrelated protocols. I wouldn't suggest trying to sift through it.
In an attempt to organize things, I've changed the blog, "Protocol by Tissue", to "EM Protocols". On it you will find a series of links that will pull different protocols from the Dump for you. For example if you want to find a specific buffer, simply look at the solutions entry and click on whatever buffer you want to find. The protocol will then be displayed for you.

Thursday, June 11, 2009

Microscope Collection

So, last week I talked about an amazing 
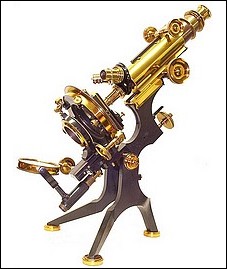
collection of microscopes at the University of Arizona College of Optical Sciences. This week, I decided to share my collection of microscopes with you. Again, they are not so much antique as they are vintage. The smaller one (right)was likely a model for school children in the 1940's or 50's. It came in a neat wooden box containing a few tools, a slide, and an old catalog from the company. Here (left) is an image I took with it of a piece of mica that i found in some potting soil.

The larger one (bottom right) with the odd looking bar is an old Carl Zeiss model (#316645 if you're interested). I consulted with a director of the Zeiss historical society about what it is and what it's function was and he thinks that it was measuring tool designed by Zeiss for use in the Zeiss factory for a quality.

Both of these microscopes were rather affordable. Probably because they were both extremely dirty when I bought them. They were obviously well used, especially the Zeiss. I spent several pleasant evenings in harsh light with a long drawn out whiskey, carefully removing every screw, opening every objective and condenser, polishing every lens, and loving every minute of it before putting it all back together. By the end, they look more or less brand new. In the Zeiss, I found a protractor in the eye-piece that I carefully aligned into the CORRECT position (the factory apparently neglected to do so in manufacturing). I also found a small prism in there.
Click the images to enlarge them.
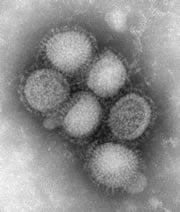
Processing by Tissue

I have expanded the Protocols and added a filter for processing tissues. Above, under Just Protocols is another link to Processing by Tissue. This will take you to another blog with links to tag filters by tissue. Simply click on the tissue that you are going to process and it will display all protocols related to that tissue. This will include the process and formulas for all related solutions.

Wednesday, June 10, 2009

More Imge Stitching

As you'll remember, yesterday I posted a guppy eye that had been pieced together from many images into one large image. Here is a more recent example of image stitching. This is a cell (provided by Nicholas Manel of the Littman lab at the NYUMC Skirball Institute) that I took several images of with an electron microscope. You really have to click this one to see all the good stuff:


In this project we were counting HIV viruses. The small dark dots surrounding the cell are the viruses. Notice, some of them are budding from the surface of the cell membrane. The light blob with the double membrane and dark border is the nucleus of the cell. The small round dark gray objects are called mitochondria (there are two at about 1:30 relative to the nucleus), and in about the center of the image there is a beautiful example of a golgi (about 5:00 from the nucleus).
These images taken on a Philips CM-12 Transmission Electron Microscope and were stitched together in Photoshop (I didn't have to spend a long time doing it manually this time). Again, the image size was reduced for the web.

New Blog..Just EM Protocols

Hello fellow readers. I realize that the protocols are a bit of a dry read and are more utilitarian than entertaining. So, I have stared a second blog that is just for protocols, removed the protocols from this page, and republished them on my new EM Protocols blog. If you want to visit the site, I also have a link just below the title of this page.

Tuesday, June 9, 2009

Guppy Eye

If you couldn't tell by now, I did a big project with guppy embryos when I was in school. Here's another image. Click to enlarge.
This is a 500 nm thick cross section of the eye of a guppy embryo. The lens (bottom part) of the eye was a bit deformed, but I think the rest of it survived the sample processing in tact. It was stained with Polychrome Blue and imaged on an optical light microscope. The interesting thing about this image is how it was constructed. I used a 40x lens and captured about 40 images. They were then manually stitched together in Photoshop (I was using CS1, when there was no option to do it automatically). Once completed, the image was 14,400 x 10,800 pixels (about 155 megapixels) and storage about a half of a gigabyte! I drastically reduced the size in order to publish it here, but I think it still looks pretty crisp. The original version could be zoomed in and viewed at high magnification.

Microscopes in the lab

Here are a couple of pictures I took of the two Transmission Electron Microscopes (click to enlarge) that are currently in our lab. I Photoshoped them a little to cut out the background. On the left is the Philips CM-12. This is our work-horse and the instrument that I use the most. It's source is a Tungsten Filament that can run at 120kV. Most of the TEM images that you will see on this blog were taken using this microscope.
On the right is the Philips CM-200. This microscope is mostly used by the structural biologists in the institute for studying protein crystals and single particles. It's source is a Field Emission Gun that can run at 200kV. The CM-200 has a special cryo-stage for doing cryo-electron microscopy can also be controlled by a computer. This is handy for doing Electron Tomography, a special type of imaging that can make 3D reconstructions. See movie below.

By the way, I can't take credit for this video. Whoever created it likely spent years developing getting the right conditions for the sample and many many hours on image acquisition and processing.

Monday, June 8, 2009

D'na..d'na, d'na, d'na, d'na..wrEEEEEEEE! *jaws theme*

Did you know that guppies have teeth? I didn't 'till i put it in the SEM. This is another one from the guppy embryos back in school.

These images were taken on a Hitachi2700 SEM.

Sunday, June 7, 2009

Cancer Cells

Here's a neat video of some cancer cells imaged by the Cancer Research UK Electron Microscopy Unit, based at the London Research Institute.

Cancer cells are interesting. They don't communicate with other cells, don't seem to die off like normal cells (apoptosis), and they divide rapidly and invade the body. It is like the equivalent up having thousands of tiny foreign objects into your body.

DLP Mirrors


Here's another entry of some images from when I was back in school. One day, my professor (Bill Carmichael at MATC Madison) brought in a DLP chip from a DLP projection television. The concept of how a DLP television works is quite unique. The chip is set up as an array of tiny little mirrors. Each one moves individually to project tiny bits of the image. With most DLPs, each mirror is responsible for one pixel.


Due to a mishap in the sample preparation of the chip, some of the mirrors fell off of their mechanical posts. This turned out to be a happy accident as it exposed the machinery so that more than just an array of mirrors could be seen. I captured these images on a Hitachi 2700 Scanning Electron Microscope. Click on each image to enlarge them.

Friday, June 5, 2009

Centrioles!


It can be difficult to find a good pair of centioles. These are two cylindrical shaped organelles arranged perpendicular to each other composed of microtubules. They are located in the centrosome of the cell and are associated with cell division. Finding a complete pair is rare since there are only two of them in a cell and we are looking at a roughly 50 nanometer thick slice of a cell that is 20 microns thick (about 400 times thicker than the section). Click to enlarge.


These were found in Lymphocytes from a mouse Lymph Node. The Lymph Node was processed by Jaime Lladora of the NYU Skirball Institute. The images were gathered on a Philips CM12 Transmission Electron Microscope and a Gatan 4k x 2.67k digital camera.

Helium Ion Microscope

This week, we hosted a visit from Zeiss. They gave a presentation on a new technology that they just acquired called a Helium Ion Microscope. I remember seeing this demonstrated two years ago at the Microscopy & Microanalysis Convention in Chicago. Allis, which was purchased by Zeiss two years ago was the company that successfully figured out how to make it work.

This is a devise similar to a Scanning Electron Microscope, but uses Helium ions to create secondary electrons off the sample instead of an electron beam. This has advantages of getting much better resolution (due to it's incredibly small virtual source of three atoms), and an amazing depth of field compared to standard SEM. I think that this tool has the potential to replace the Scanning Electron Microscope, but they're about twice as expensive as a high-end SEM right now. There are only 7 being used in the world right now (soon to be 8). One is at Harvard and there is another in Singapore (where the speaker is teaching right now).
In all, the event was a success. Thirty plus people showed up from all over the New York area including people from Rockefeller University, the New York Structural Biology Center, and the New York University School of Medicine.

C. Elegans Vulva

While working on a project where we are looking at the embryos inside the c. elegans worm, we came across this beautiful example of worm anatomy. This is the vulva of the c. elegans. Notice the magnificent smooth muscle. Click to enlarge.


This worm (provided by Ann Wehman of the Nance lab in the NYUMC Skirball Institute) was processed with high pressure freezing (By KD Derr at the NYSBC)and embedded in Epon. Sections were taken with a diamond knife at a thickness of 60 nm on a Leica UC6 ultramicrotome. The image was taken on a Philips CM12 TEM at 120kV with a Gatan 4k x 2.67k camera.


The c. elegans (Caenorhabditis elegans) is a roundworm about a millimeter long that lives in the dirt. They are frequently studied in biological research. NASA is even taking them into space.

Thursday, June 4, 2009

Antique microscopes


I've recently begun to collect antique microscopes, but the two I own now would be considered more vintage than antique. I wish to one day own some like this from the University of Arizona College of Optical Sciences collection of antique microscopes.
There are some of the highest quality images of the most beautiful microscopes. Definitely worth a look if you are interested in antique microscope. They even have some made of wood from the 1700s.

A few pics

Let's add some fun pics. I've been in the EM field for a few years now. Here are a few images from back in school. All can be clicked to view them larger. More current work will follow.
This is a diatome. In the background are broken up ones. This was gathered from some diatomaceuos earth that we bought to keep slugs away from the veggies we were growing. The image was gathered with a Hitachi 2700 SEM and colorized in Photoshop.


This is some moss I found growing between two pieces of sidewalk. The image was gathered with a Hitachi 2700 SEM and colorized in Photoshop.


Here are a few images of some gills from a guppy embryo. Some were freeze fractured with liquid nitrogen to expose the contents. The images were gathered on a JEOL 840 SEM. One was colorized in Photoshop.
Hello all,

With any luck, this will turn into a good resource for anyone interested in electron microscopy. I plan to post current protocols I'm using, images from the myriad of different samples I encounter, as well as cool microscopy related news.

Stay tuned!